CERN Openlab project: AVEditor
The project that I worked on during my CERN Openlab internship in the summer of 2017, was the AVEditor project. This project consisted of the development of a server side application used for video manipulation and encoding.
In this post I will describe the functionalities and the technologies used to create the AVEditor.
Original repository for the project: https://gitlab.cern.ch/webcast/AVEditor/tree/openshift
AVEditor introduction
The AVEditor tool has been developed as a solution to the time-consuming task of manually editing virtual visits and webcast videos. As no previous software implementation was used to perform this kind of a task in CERN, the tool was started as a new project and build from the ground up. This allowed me to make decisions about the technologies, design patterns and architecture of the application in a very flexible way.
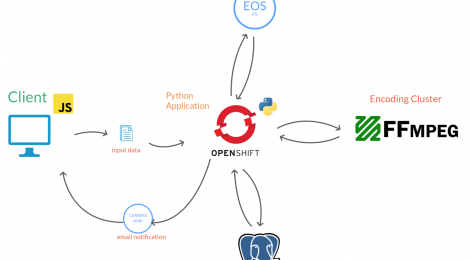
The AVEditor tool can be viewed under two main branches: The server-side and the client-side application.
The server-side application is hosted on Openshift, a cloud application hosting platform, and was built using the Python 3.4 language, along with the popular Flask web framework. The use of Flask made it easier to develop a large web application and to create the various API endpoints necessary for the client-server interaction. The core work of the application is defined by the trimming, encoding and concatenation of slides to the video, and is carried out by a cluster of machines running FFmpeg.
FFmpeg is a codec library written in C used to execute several operations on media files such as videos, audios and images. For more information on the role played by the FFmpeg library see the Section 06 of this report.
The client side application makes use of JavaScript to handle user interaction and form validation, it also performs the video upload using Asynchronous JS.
The workflow of the application can be roughly condensed to the following operations:
1) Asynchronous upload of the main video file to the Network File System (EOS).
2) Collection of the information about the uploaded video such as format, resolution and duration, and posting this to the client-side application. This information will be used to carry out a simple front-end form validation.
3) Main form submission containing details of the tasks to be executed on the video. The data from this form will be stored on a PostgreSQL database for future reference.
4) Once the system is ready, a job will be sent to an encoding cluster that will manage the processing and will return results on task completion.
5) Based on the success or failure of the processing job, the user will receive the appropriate email containing either the link for the download of the processed video, or the details of the error that occurred.
Client side application
The client side application is the first thing the user can see when the application is accessed through its URL.
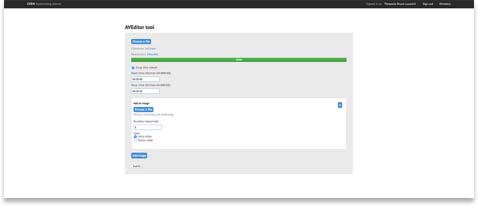
The interface consists of 3 main sections:
- Video file input
- Trimming section containing crop start and stop time inputs
- Slide upload form containing:
- Image file input
- Slide duration input
- Intro or outro radio input
The user interface may appear to be formed by one main form, but code-wise it contains two separate forms. This is because the video will be uploaded immediately when the user selects a file from the file system. The video upload is performed in an asynchronous manner using AJAX, which allows the user to complete the rest of the form while waiting for the file upload to complete.
When the video is completely uploaded, the server will respond to the client with a JSON object containing the following information: filename, duration and resolution.
This information will be used by the JavaScript application to enforce a series of validation rules on the form’s inputs like: ensuring that the crop start and stop time do not exceed the duration of the video and ensuring that these times are in the correct format (HH:MM:SS)
EOS Network file system
When the server side application receives the POST request to the ‘/upload’ endpoint, as a first step the video gets saved to the database and in a second moment it gets saved to the EOS FS (a fast and reliable disk only storage technology for CERN).
The reason for using the EOS FS is given by the fact that there is a need to access shared data between the Flask application on Openshift and the encoding cluster. By using EOS, the two services can quickly read and write data to a shared folder and work on the same video files. The EOS file system is mounted to the Openshift server and acts as a normal part of the main FS, allowing the application to use the same code in development and production.
Files are stored on disk using a structured directory system. The main directory can be found inside the UPLOADED_VIDEO_DEST Flask app configuration. This folder will contain two sub folders:
/in
/out
The /in folder is used to store all the uploaded and temporary files. The /out folder is used to store the post-processed video. Both folders use an id based system to separate ongoing jobs from one another.
Whenever a video is uploaded, a uniquely named directory is created in the /in folder taking its name from the id of the video in the database. This folder will act as a container for the input video and image files. Once the file has been processed, the final video will be store in a similar directory inside the /out folder.
For example, if a video with an id of 1 and two slides are uploaded to the application, the resulting folder structure will look like this:
/ in
| /1
| | vid.mp4
| | /img
| | | slide1.png
| | | slide2.png
/ out
| /1
| | output.mp4
Retrieving video stream information with FFprobe
a. Remote code execution
FFmpeg commands are not executed on the same machine as the Flask application server. In fact, the FFmpeg commands are executed remotely on a cluster of machines through an SSH client. The result of the executed command is then sent back to the application for parsing and gets forwarded to the next step of the application.
b. JSON video stream data
When the video and relevant files are saved to the EOS file system, the first of the remote FFmpeg commands is executed. This command make use of FFprobe
FFprobe is a component of the FFmpeg library and it is a command line tool that is used to display media information in a convenient format. In this case the FFprobe command is executed using the video file as an input. The FFprobe command executed to get the video stream data from the input video is:
ffprobe -v quiet -print_format json -show_format -show_entries stream=width,height,duration,codec_type
This command will return meta data of the video and contains several flags that tweak the outcome of the output. For example, by using -print_format json it is specified that the result of the command will be presented in JSON format. Next the -show_format and -show_entries are used to make sure that all the information needed is included in the JSON output. Finally, a filter is applied to only select the specified attributes of the video and audio streams, making the JSON output much smaller and more readable.
The following is a sample of an output coming from the FFprobe command executed on a test video:
{ “programs”: [ ], “streams”: [ { “codec_type”: “audio”, “duration”: “368.910227” }, { “codec_type”: “video”, “width”: 1280, “height”: 720, “duration”: “368.910208” }, { “codec_type”: “data”, “duration”: “368.910000” }, { “codec_type”: “data”, “duration”: “368.910000” } ], “format”: { “filename”: “/mnt/eos/in/1/vid.mp4”, “nb_streams”: 4, “nb_programs”: 0, “format_name”: “mov,mp4,m4a,3gp,3g2,mj2”, “format_long_name”: “QuickTime / MOV”, “start_time”: “0.000000”, “duration”: “368.910000”, “size”: “235008985”, “bit_rate”: “5096288”, “probe_score”: 100, “tags”: { “major_brand”: “mp42”, “minor_version”: “0”, “compatible_brands”: “mp42isomavc1”, “creation_time”: “2017-08-02 15:31:15”, “compilation”: “0”, “encoder”: “Sorenson Squeeze” } } }
The information contained in this JSON object is then sent back to the client and displayed in the HTML form.
User input validation
All the data coming from the client form is passed through a validation process that uses a set of rules to determine whether the form is valid or invalid. If the form is deemed valid, then the application can continue to the next steps. If the form however is not considered valid, the application will return immediately and notify the user of the error.
Form validation is carried out by using a Python module called WTF-Forms. This module allows the programmer to automatically generate and validate forms directly in the server-side code, making the validation process much easier to handle.
In this application, there is a strong need to validate and secure the form data as there are many instances where code injections are possible. Some of the validation rules applied are:
| Validator | Use case |
| FileAllowed | Specifies the file format that can be submitted to the application. In this case only .mp4 files are allowed for the video form, and all image files are allowed on the slide form. |
| DataRequired | This validator ensures that the selected field cannot be empty |
| time_regex | Custom validator that ensures that the submitted dates are in the HH:MM:SS |
| RequiredIf | Validator used to conditionally require another field. |
FFmpeg video editing and encoding
The main work of the application is done by the encoding cluster when cutting, concatenating slides and encoding the video. This work is not done by the Python application, but is delegated to a cluster of machines running FFmpeg. The video processing is triggered by the Flask application when the second form is received and it involves the following tasks:
- Trimming the video to a specified start and stop time
- Concatenating intro and outro slides to the video
- Encoding the video to a standard format (H.624, AAC)
a. Video trimming
The submitted form contains a Boolean value called crop_bool, if this value is set to True then the trimming of the video will be based on two values: crop_start and crop_end. If crop_bool is set to False, then the application skips the trimming phase and passes directly to the concatenation and encoding step.
The FFmpeg command executed to trim a video given start and stop time is:
ffmpeg -i -ss -t -c copy
As FFmpeg does not allow for the output file to override the input file, it is necessary to save the trimmed video to a temporary file, delete the original video and rename the temporary file as the original video. Once this command has terminated with a success exit code (0) the application will pass to the next step. In the case that the command terminates with a failure exit code (1) the application will stop processing the video, delete the video form the File System and notify the user of the error.
b. Slide concatenation and video encoding
The concatenation of the intro / outro slides and the encoding of the video is done all in one FFmpeg command. The command executed has the following format:
ffmpeg -loop 1 -t 5 -i
-loop 1 -t 5 -i
-t 5 -f lavfi -i aevalsrc=0
-i
-filter_complex
“[0:v]scale=1280:720:force_original_aspect_ratio=decrease,pad=1280:720:(ow-iw)/2:(oh-ih)/2[v0];
[1:v]scale=1280:720:force_original_aspect_ratio=decrease,pad=1280:720:(ow-iw)/2:(oh-ih)/2[v1];
[v1][2:a][3:v][3:a][v0][2:a] concat=n=3:v=1:a=1”
This command can be broken down in the following;
Generation of video from an image: It is not possible to directly concatenate an image to a video, because these are two different file types. Therefore, it is necessary to generate videos from the images and then concatenate those videos with the original video.
Generating a video from an image using FFmpeg is quite straight forward and can be done using the following command:
-loop 1 -t 5 -i
Generation of null audio stream: The generated slide-video will contain no audio source and as per rule every video must contain an audio stream. Therefore, it is necessary to join the video stream with a null audio source.
The following is the portion of the command that generates the null audio source.
-f lavfi -i aevalsrc=0
Complex filter: After passing all the inputs to the command, a series of filtering rules are applied to the input. These rules are called the complex filters and in this case, they are used to define the output’s resolution, aspect ratio and border padding.
The following is an example of a complex filter used to scale the slide-videos to the correct resolution and to force the original aspect ratio to be maintained. It also ensures that a padding is applied to the images if empty space is present.
[0:v]scale=480:360:force_original_aspect_ratio=decrease,pad=480:360:(ow-iw)/2:(oh-ih)/2[v0]
This command selects the video stream of the 0th input [0:v] and applies the previously mentioned complex filters to it. The result of this filter is then piped to the next part of the command and is referenced using an alias. In this case [v0].
Concatenation of media streams: The final step of the FFmpeg command is the concatenation of the inputs and the temporary files generated by the complex filter.
[v1][2:a][3:v][3:a][v0][2:a] concat=n=3:v=1:a=1″
FFmpeg assigns a number to the input based on the order in which they appear. In this case the null audio stream is the second input (0 based index) in the command. So for example, we can access the audio stream of this input using this syntax: [2:a].
The above command takes two video streams generated by the complex filters and concatenates them to the null audio source and original video / audio stream. The last part of the command (concat) specifies the number of media files passed as input and the number of audio / video stream to be outputted.
User notification and error reporting
When a job is submitted to the server, there is no need for the user to wait for the processing to complete.
For this reason, the user will immediately receive a notice containing the message:
Your job is being processed, you will receive an email once it is completed
After viewing this screen, the user is free to close the browser and terminated the connection with the server. This might seem like the client will be left in the dark regarding the progress of the video processing. However, communication with the user for job completion or error reporting is done via e-mail.
The user in fact will receive an e-mail as soon as the job has been completed containing a message, and in the case of job success, a link to the ready-to-download file.
Error reporting is done in a similar fashion. If during any of the editing or encoding steps an error should occur, an e-mail would be sent to the client containing an error code and the reasons behind the failure.
Additional notes
a. User authentication
The application is internally hosted by CERN and can only be accessed from within the network. User can access the AVEditor tool by signing in using their CERN work account. The sign-in process is handler by CERN’s OAUTH 2 protocol.
b. Unit testing
The testing of the application has been performed using the Python modules: pytest and Flask-Testing. Most of the testing is focused on the correct result in response to the POST request received from the client. Database models and form validation code have also been tested and verified.